Blog 2021

Latest

Posted On: July 16, 2023
Posted On: June 04, 2023
Posted On: April 04, 2023
Posted On: March 28, 2023
Posted On: March 14, 2023

Subscribe

Via Email:    

Archive


POINSETTIA SEASON IS UPON US

Posted On: December 02, 2021

Poinsettia plants are native to Central America, especially an area of southern Mexico known as 'Taxco del Alarcon' where they flower during the winter. The ancient Aztecs called them 'cuetlaxochitl'. The Aztecs had many uses for them including using the flowers (actually special types of leaves known as bracts rather than being flowers) to make a purple dye for clothes and cosmetics and the milky white sap was made into a medicine to treat fevers. (Today we call the sap latex!)

The poinsettia was made widely known because of a man called Joel Roberts Poinsett (that's why we call them Poinsettia!). He was the first Ambassador from the USA to Mexico in 1825. Poinsett had some greenhouses on his plantations in South Carolina, and while visiting the Taco area in 1828, he became very interested in the plants. He immediately sent some of the plants back to South Carolina, where he began growing the plants and sending them to friends and botanical gardens.

One of the friends he sent plants to was John Barroom of Philadelphia, who gave the plant to his friend, Robert Buist, a plants-man from Pennsylvania. Robert Buist was probably the first person to have sold the poinsettias under their botanical, or latin name, name 'Euphorbia pulcherrima' (it means, 'the most beautiful Euphorbia'). It is thought that they became known as Poinsettia in the mid 1830's when people found out who had first brought them to America from Mexico.

There is an old Mexican legend about how Poinsettias and Christmas come together, it goes like this:

There was once a poor Mexican girl called Pepita who had no present to give the the baby Jesus at the Christmas Eve Services. As Pepita walked to the chapel, sadly, her cousin Pedro tried to cheer her up.
'Pepita', he said "I'm sure that even the smallest gift, given by someone who loves him will make Jesus Happy."

Pepita didn't know what she could give, so she picked a small handful of weeds from the roadside and made them into a a small bouquet. She felt embarrassed because she could only give this small present to Jesus. As she walked through the chapel to the altar, she remembered what Pedro had said. She began to feel better, knelt down and put the bouquet at the bottom of the nativity scene. Suddenly, the bouquet of weeds burst into bright red flowers, and everyone who saw them were sure they had seen a miracle. From that day on, the bright red flowers were known as the 'Flores de Noche Buena', or 'Flowers of the Holy Night'.

The shape of the poinsettia flower and leaves are sometimes thought as a symbol of the Star of Bethlehem which led the Wise Men to Jesus. The red colored leaves symbolize the blood of Christ. The white leaves represent his purity.

0

DON'T LET YOUR BATTERIES LET YOU DOWN

Posted On: November 30, 2021

Winter Battery Storage

When wet-cell batteries are allowed to discharge, the electrolyte becomes pure water, which will freeze and ruin the battery. If you can, take the battery off your boat and store it somewhere dry and cool (but not freezing). You may have heard that a battery will discharge if left on a concrete floor, but modern batteries make this precaution unnecessary.

Wash and thoroughly dry the top of the battery to reduce the potential for self-discharge. Don't leave stored batteries connected to a portable charger. Unless the charger turns off completely — few do — the batteries will suffer damage. However, stored batteries should be brought to full charge once a month, so post a reminder for yourself. If the batteries will be stored aboard because they're too heavy for convenient removal, they must be maintained in a full-charge condition all winter. This requires a charger with a "float" stage and power connection. In lieu of an unattended power connection, a solar panel might be employed to counter self-discharge

0

THANKSGIVING HISTORY

Posted On: November 24, 2021

Thanksgiving History Enjoy the Parade !

From fall feast to national holiday


The first American Thanksgiving was celebrated in 1621, to commemorate the harvest reaped by the Plymouth Colony after a harsh winter. In that year Governor William Bradford proclaimed a day of thanksgiving. The colonists celebrated it as a traditional English harvest feast, to which they invited the local Wampanoag Indians.

A New National Holiday

By the mid–1800s, many states observed a Thanksgiving holiday. Meanwhile, the poet and editor Sarah J. Hale had begun lobbying for a national Thanksgiving holiday. During the Civil War, President Abraham Lincoln, looking for ways to unite the nation, discussed the subject with Hale. In 1863 he gave his Thanksgiving Proclamation, declaring the last Thursday in November a day of thanksgiving.

In 1939, 1940, and 1941 Franklin D. Roosevelt, seeking to lengthen the Christmas shopping season, proclaimed Thanksgiving the third Thursday in November. Controversy followed, and Congress passed a joint resolution in 1941 decreeing that Thanksgiving should fall on the fourth Thursday of November, where it remains.

0

TURKEY CARVING 2021

Posted On: November 23, 2021


Carving the Perfect Turkey    


Every year, countless families cringe as the annual carve the turkey debate rages on. So in the interest of harmony and Thanksgiving, here's what the pro's say.


Steps to serving the perfect Thanksgiving bird

by Gerry Brown

Carving, and serving, the perfect turkey


Many beautiful Thanksgiving feasts have been spoiled when the golden brown turkey is hacked to pieces by an improperly trained carver. Whether you are looking to improve your technique, confirm that you are doing it right, or getting ready to pass the knife to Junior this year, here's a quick look at the proper way to look good slicing up and giving your family the bird.


What you'll need:


  •         a turkey;
  •         a good, long, sharp knife (an electric carving knife is nice but unnecessary and can often be more trouble than it's worth; if you're just starting out, go with an old fashioned manual model);
  •         a carving fork;
  •         an apron;
  •         a spot to place the meat as it's cut.


Step One

A Perfectly Cooked Turkey

Make sure the turkey is done! Sounds simple but several variables can conspire to throw off the pre-cooked time calculations. You want to make sure that you use a real meat thermometer, not one of those pop-up deals. Most times you'll end up with an overdone, dried out turkey and that's a nightmare for carvers. The meat will shred and crumble.


Assuming the turkey is stuffed, stick the tip of the thermometer into the stuffed cavity of the turkey. If the turkey is not stuffed, put the thermometer into the thigh pointing toward the body, but make sure it doesn't touch bone. If you are using an instant-read thermometer, don't leave it in while the turkey is roasting. The turkey is done when the thermometer says 160°F in the center of the stuffing or 180°F deep in the thigh; also, the turkey's juices should be clear, not reddish pink when thigh muscle is pierced deeply.

Step Two            


The turkey is done. Now take it out of the oven and let it "rest" for 20–30 minutes on the cutting board. Wash and dry your hands and put on your apron if you haven't already. Remove the stuffing from the bird and keep it warm. You are now ready to begin carving. The first thing you'll want to do is remove the leg on one side.


Some will tell you to steady the turkey with your big carving fork and use your knife to slice between the leg and the body of the turkey. Others will say to pull the leg gently away from the turkey while you cut with the other hand. Either way, you'll want to use the tip of the knife to probe the area just above thigh to find the joint that connects the leg to the turkey. That's the magic slice point.


Once you find the joint, cut it firmly but smoothly. Usually it will cut through with relative ease but if not, check to make sure you are not trying to cut through bone. Once you get the leg off the bone you can cut some meat off the leg. But first separate the thigh from the drumstick by cutting through the joint that connects them. The thigh is simple to carve—just slice the meat parallel to the bone.


A lot of people just leave the drumsticks intact because that's the way the kids like them. But if you want to carve them, here's how: hold the drumstick by the small end and rest the big end on the cutting board and slice downward. Don't try to get slices that are too thin. Go for medium-sized pieces.

Step Three

 Before you attempt to carve the breast you need to cut off the wings. Do this in the same way you did the legs. Find the joint near the turkey's body and cut through the magic slice point.

Step Four

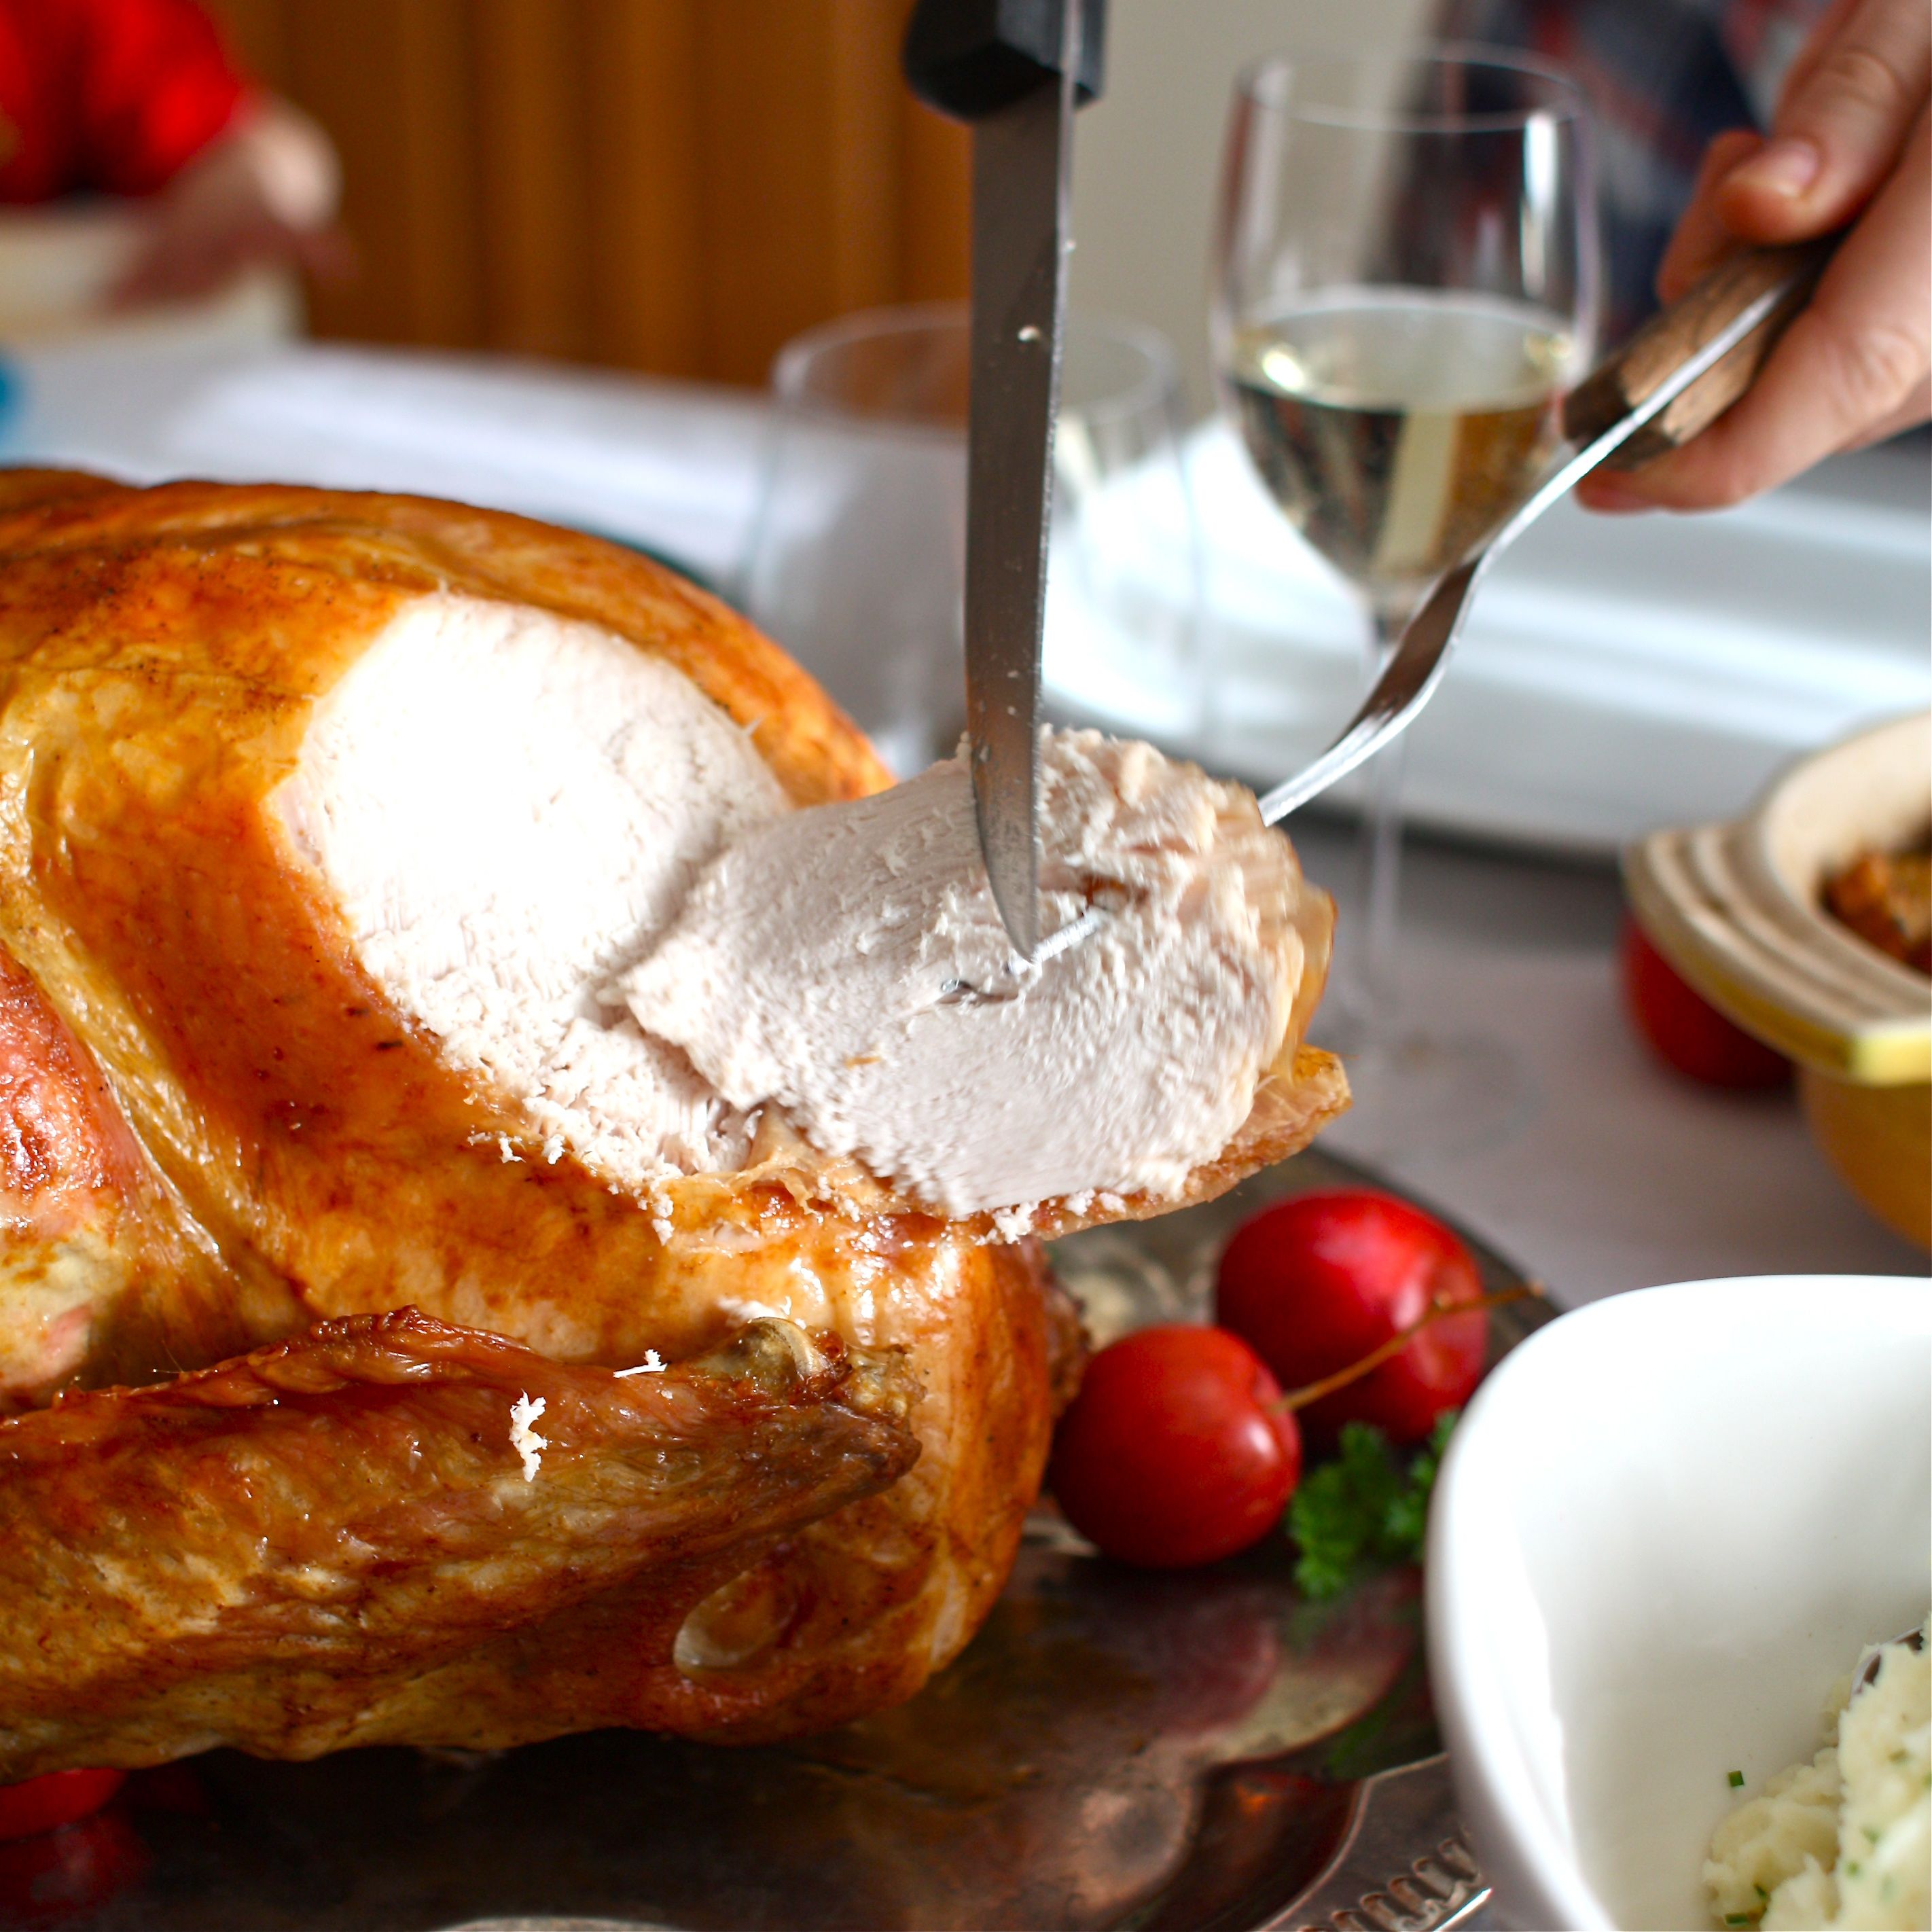
Carving A Perfectly Cooked Turkey

Now, this is one of the most crucial and controversial steps. There are two general schools of thought on the best way to carve the breast. Most people like the white breast meat, so this is the step that makes or breaks your carving reputation.


There is the traditional method, in which one cuts the breast one slice at a time away from the bird. Another method, sometimes called the "kitchen method" because it is usually done out of view of the guests, involved cutting the entire breast away from the bird and then slicing it into pieces.


The traditional method is a little easier and by far the most popular. In the kitchen method you may be able to regulate the thickness of each individual slice a little better, but it should be done by only those who have mastered the traditional method first.

If you're sticking with the traditional method, steady the turkey with your fork and slowly and smoothly carve the turkey breast in downward-slanting slices. Start with a small slice, roughly the diameter of a soda can, and as you cut, the slices will get larger. As you are cutting periodically check to make sure that the slices are even and not thicker on one end or the other. As they come off the bird, stack the slices as neatly as possible on a serving platter. Sliced meat cools fast so serve it quickly or have some piping hot gravy on standby if things cool off.

Step Five

 Repeat step four on the other side of the bird.

Step Six

 Serve it up, say grace, and dig in with the satisfaction of knowing that you are the best carver at the table.

0

STUFFING THE RIGHT WAY

Posted On: November 18, 2021

Many experts recommend baking the stuffing outside the bird, where it can easily be cooked to 165°F and is less likely to harbor bacteria. However, many people who grew up eating stuffing from inside the bird find it lacking moisture and flavor when it's baked in a casserole dish, without the benefit of the turkey's juices.

Luckily, whichever method you prefer, there are ways to get around the problems. If you choose to bake your stuffing alongside the bird, drizzle 1/4 to 1/2 a cup of extra stock over it before it goes in the oven. This will replace the extra moisture and flavor the turkey would have provided. Using a rich, flavorful homemade stock will also go a long way toward providing that indescribable roast-turkey richness.

If you still want to cook the stuffing inside the bird, you should take several precautions to ensure safety. First, do not stuff your turkey until right before it goes in the oven. Yes, when faced with a long list of Thanksgiving Day tasks, it's tempting to stuff the bird the night before, stow it in the fridge, and then just pop it in the oven the next morning. But this will create an optimal environment for bacteria to flourish: The moist stuffing, likely warm from the cooked veggies and stock, will sit in the fridge for hours before it gets below the "danger zone"—the range of temperatures in which bacteria can grow. This will allow any bacteria present, already thriving in the moist conditions, to multiply like crazy. Once the stuffing finally cools down, they won't be killed—they'll just stop multiplying as quickly. Then, when the turkey goes into the oven, the stuffing, now cold from the fridge, will take quite a while to heat up, again spending hours in the danger zone.

Instead of this risky procedure, cook any veggies for the stuffing the night before, but do not mix them with the bread, stock, and eggs. (Even if you don't stuff the bird, just mixing the wet ingredients and the bread can be too inviting to bacteria.) The next morning, heat the stock and combine it with the other stuffing ingredients, then immediately fill and roast the bird. Using warm stuffing and putting the turkey in the oven immediately will help the stuffing spend as little time in the "danger zone" as possible.

Finally, when the bird is done, take the temperature of the stuffing as well as the meat. Bacteria cannot survive above 165°F, so most recipes call for using a probe thermometer to verify that the thigh has reached this temperature before removing the turkey from the oven. (Some cooks prefer to remove their birds at 150°F on the assumption that the temperature will rise to 165°F as the meat rests; this is safer if you buy an organic or heritage turkey, which is less likely to contain bacteria

However, just because the thigh meat has reached 165°F doesn't mean the stuffing has, too. So, be sure to insert your thermometer into the very center of the cavity as well. If the bird is done but the stuffing isn't, use this tip:  spoon the stuffing out into a bowl and microwave it until it registers 165°F. This will allow you to have moist, not overcooked meat and safe stuffing at the same time.

0

THE FALL ITCH - GET A SURVEY

Posted On: November 16, 2021

Get A Survey

It's easy to fall in love with an appealing sheer line, shimmering gelcoat, and gleaming teak, but DON’T let your heart guide you; you need an objective marine survey to avoid buying with rose-colored sunglasses on.

A marine survey is an independent evaluation of a boat's condition and value, performed by a qualified inspector who has no stake in the outcome. In fact, even experienced surveyors will usually hire a fellow professional to do the survey on a boat they're considering, to keep emotion out of the equation. Many boats sit unused and get minimal maintenance. When these boats begin to be sold, a professional evaluation, devoid of the excitement of boat-buying, is even more critical. Here's what a good survey provides:

  • The condition of the boat and its equipment: A marine survey gives a snapshot of the condition of the boat's visible components and accessible structures at the time of the inspection. A survey provides a list of deficiencies as well as needed repairs and focuses on safety. Deficiencies in a survey can be used to renegotiate the sales price or scrap the deal altogether if needed repairs are too expensive or complicated.
  • The value of the boat: Surveyors use pricing guides along with their vast experience in valuing boats. A seller or broker may think a boat has a specific worth, but until a survey is performed, those figures are only guesses. Banks and insurance companies use the survey value to determine loan and insurance hull value amounts. This is also a great tool for price negotiations and can easily pay for the cost of the survey.
  • A budget for repairs and maintenance: Nearly any boat will have some defects and deficiencies; knowing what they are beforehand makes it easier to know how much to budget for the future. Surveys typically provide a list of recommended, prioritized repairs. The most important ones are critical to safety and usually your insurance company will require them to be completed. The rest are things that can be done as you find time and money.
0

REMEMBRANCES OF OUR VETERANS

Posted On: November 11, 2021

On this Veterans Day, Remember our Vets and value what we have because of their efforts.


On November 10, 1775, Philadelphia native Captain Samuel Nicholas formed the the first two battalions of the Continental Marines of the American Revolutionary War after realizing the need for a group able to battle both on water and on land. That institution has transformed and evolved into the few, the proud: the modern day United States Marine Corps.

Wednesday marked 246 years since the creation of the Marine Corps, and it has grown from Captain Nicholas' initial two battalions to roughly 194,000 active members and 40,000 reserve Marines, though it remains the smallest branch of the United States Armed Forces within the Department of Defense.

The official title of United States Marine Corps was incorporated in 1798. The Continental Marines, as well as the Continental Navy, were temporarily disbanded at the completion of the American Revolution. The Marines in particular were reinstated in preparation for the Quasi-War, which was fought against Spain and the French Republic, and mostly at sea.

Since its creation, the Marine Corps has earned recognition by serving in the majority of American wars. Their well-known motto, "Semper Fidelis," often shortened to "Semper Fi," appropriately translates to "Always Faithful." Marines are capable of fighting via land, air and sea, and every member of the Marines receives additional training as a rifleman. The Marine Corps works closely with the United States Navy, as these two services make up the United States Department of the Navy.

0

TIME FOR A FALL COVERUP

Posted On: November 09, 2021


Custom-made winter covers, typically canvas or synthetic, are a terrific benefit to your boat's gel coat and general well-being.

A good well-supported cover offers many benefits. It keeps leaves and debris from clogging scuppers and causing the boat to flood when a downpour comes or the snow melts. It keeps snow from accumulating in the cockpit and forcing the boat underwater in its slip or damaging thru-hull fittings on boats on the hard when melt-water freezes.

It protects the deck from pooling water that can lead to de-lamination and freeze damage. And it protects gel coat on the deck and coach roof from the elements, extending its life.

The best covers are custom made from canvas. With any custom cover, a frame, either wood or aluminum, should be used to circulate air and prevent pooling on the cover. Vents should also be built into the cover to encourage ventilation and reduce mildew. Never secure the boat's winter cover to the jack stands or support blocks because the stands can be yanked out during a strong blow.

Though shrink-wrapping is very effective at keeping rain and snow out, it will also trap moisture inside and create horrendous mildew problems if vents aren't used along the entire length of the cover. Another problem: Cabins and decks painted with two-part polyurethane paints may peel or bubble where the shrink-wrap touches it.

Inserting a series of foam pads between the hull and cover allows condensation to escape. Finally, don't shrink-wrap the boat yourself.

All it takes is a moment of inattention to ignite the shrink-wrap, and if the fire occurs inside the cover, it might not even be visible right away.

This is one job best left to the pros.

0