Blog November 2019

Latest

Posted On: July 16, 2023
Posted On: June 04, 2023
Posted On: April 04, 2023
Posted On: March 28, 2023
Posted On: March 14, 2023

Subscribe

Via Email:    

Archive


GIVE THANKS

Posted On: November 28, 2019


GIVING THANKS

 As we now are in the crazy, turkey-eating, football-watching, family-hosting holiday of Thanksgiving and the rest of the winter holidays, we think it’s an appropriate time to reflect on all that we have to be thankful for.

I am thankful for my family, my friends, my clients, and my good fortune. I am lucky enough to perform at a job that I truly enjoy.

We hope you were able to get out on the water as much as possible this boating season. The weather most weekends was glorious and beckoned us to get out and go fishing, sailing, cruising, tubing, racing, dock bar hopping, sight-seeing, and doing all else that floats our boats

Luckily, this year, we could count the warnings that stalled weekend plans on one hand. It doesn’t get better than that! Heck, boating, fishing, even a little alone time.(Shhhhh….!!!)

As the holiday season embraces us and we tend to spend more time on land than on the water, we wish you and yours the best of off-seasons.

Raise a toast to an early spring and give thanks for what you have!!

0

THE SKINNY ON STUFFING

Posted On: November 26, 2019


Many experts recommend baking the stuffing outside the bird, where it can easily be cooked to 165°F and is less likely to harbor bacteria. However, many people who grew up eating stuffing from inside the bird find it lacking moisture and flavor when it's baked in a casserole dish, without the benefit of the turkey's juices.

Luckily, whichever method you prefer, there are ways to get around the problems. If you choose to bake your stuffing alongside the bird, drizzle 1/4 to 1/2 a cup of extra stock over it before it goes in the oven. This will replace the extra moisture and flavor the turkey would have provided. Using a rich, flavorful homemade stock will also go a long way toward providing that indescribable roast-turkey richness.

If you still want to cook the stuffing inside the bird, you should take several precautions to ensure safety. First, do not stuff your turkey until right before it goes in the oven. Yes, when faced with a long list of Thanksgiving Day tasks, it's tempting to stuff the bird the night before, stow it in the fridge, and then just pop it in the oven the next morning. But this will create an optimal environment for bacteria to flourish: The moist stuffing, likely warm from the cooked veggies and stock, will sit in the fridge for hours before it gets below the "danger zone"—the range of temperatures in which bacteria can grow. This will allow any bacteria present, already thriving in the moist conditions, to multiply like crazy. Once the stuffing finally cools down, they won't be killed—they'll just stop multiplying as quickly. Then, when the turkey goes into the oven, the stuffing, now cold from the fridge, will take quite a while to heat up, again spending hours in the danger zone.

Instead of this risky procedure, cook any veggies for the stuffing the night before, but do not mix them with the bread, stock, and eggs. (Even if you don't stuff the bird, just mixing the wet ingredients and the bread can be too inviting to bacteria.) The next morning, heat the stock and combine it with the other stuffing ingredients, then immediately fill and roast the bird. Using warm stuffing and putting the turkey in the oven immediately will help the stuffing spend as little time in the "danger zone" as possible.

Finally, when the bird is done, take the temperature of the stuffing as well as the meat. Bacteria cannot survive above 165°F, so most recipes call for using a probe thermometer to verify that the thigh has reached this temperature before removing the turkey from the oven. (Some cooks prefer to remove their birds at 150°F on the assumption that the temperature will rise to 165°F as the meat rests; this is safer if you buy an organic or heritage turkey, which is less likely to contain bacteria

However, just because the thigh meat has reached 165°F doesn't mean the stuffing has, too. So, be sure to insert your thermometer into the very center of the cavity as well. If the bird is done but the stuffing isn't, use this tip:  spoon the stuffing out into a bowl and microwave it until it registers 165°F. This will allow you to have moist, not overcooked meat and safe stuffing at the same time.

0

WIND GOT YOU STUCK?

Posted On: November 21, 2019

LEAVING IN THE WIND

Depending on how your boat is docked, here are five different maneuvers for getting out of the slip. Your boat's hull shape, prop walk, windage, current, and other factors may affect results.


1. Wind Pushing Starboard Side, Stern Out

Step 1: Hard left rudder. Engine forward will kick out the stern.

Step 2: Reverse engine with left rudder, after releasing line and clearing dock.

Step 3: Forward out of the marina.

2. Wind Pushing Away From Dock, Stern Out

Step 1: Engine forward and right rudder kicks out the stern.

Step 2: Engine reverse with left rudder after releasing line and clearing dock.

Step 3: Forward out of the marina.

3. Wind Pushing Port Side, Bow Out

Step 1: Reverse engine, right rudder to pivot bow into the wind.

Step 2: Remove line and steer into wind.

4. Wind Pushing Away From Dock, Bow Out

Step 1: Release bow line first, then stern and power forward with right rudder.

5. Wind Pushing Starboard Side, Bow Out

Step 1: Reverse engine, left rudder to pivot bow into the wind.

Step 2: Remove line and steer into wind.

A challenging maneuver for any boat (power, sail, big, small) is leaving the dock. Slow speed makes a boat less maneuverable because the rudder isn't very effective until the boat's going fast enough for water to flow over it cleanly. Called "steerageway," that efficient speed can be elusive when the wind's pushing you back or when you make turns, which also slow the boat.

Before heading out, check the wind strength and direction, and then plan your tactics. The illustration shows five ways to cast off from a slip and head out of a marina into a head wind. It's a two-step process. First, clear the slip, using docking lines and the engine to control the boat and prevent rubbing against the pier. Be careful, though. The forces can be larger than they appear. Then point the bow as directly as possible down the channel and get going. On that heading, turns will be gradual, which improves your speed and control

0

THE PIVOT TURN

Posted On: November 19, 2019

Making a pivot turn with a single engine is easy and will get you out of tight spaces by turning your boat around in place.

Here's how to perform this simple but useful maneuver on a boat with a single outboard or sterndrive. The key is to stay controlled and steady in your maneuvers. And remember: Slow is pro.

1. Bring your boat to a complete stop: Pause in neutral, then shift into reverse idle. Look to the side so you can gauge your boat's movement. Once the boat stops, shift into neutral.

2. Take note of wind direction and use it to help you. If possible, keep your boat to the upwind side. For example, if the wind is blowing west to east, put your boat on the west side of the fairway to account for drift. Now, turn the wheel all the way left (counterclockwise). Shift into reverse idle for 3 to 4 seconds then back to neutral so the stern goes left as the boat slowly reverses. Assess how your boat is moving. Depending on how the wind is affecting you, you can leave the wheel turned and allow the rudder effect to continue turning your boat for a short period.

3. Now turn the wheel hard in the opposite direction (clockwise in this case). Then shift into forward idle for three to four seconds, then back to neutral. You'll notice the stern still goes to the left, but now the boat is moving a bit forward, continuing its clockwise rotation. Assess your movement. Allow the boat to continue to turn. If you need to, turn the wheel hard left (counterclockwise) once again, shift into reverse for 3 to 4 seconds, then back to neutral.

4. After three to four maneuvers, your boat should be rotated 180 degrees from where you started the pivot turn. (Note: Sometimes a very brief but careful extra burst of power in the correct direction is needed to help the bow to swing.) Now put it in forward idle and get back on course. 

0

AUXILIARY COAST GUARD HAD HUMBLING BEGINNINGS

Posted On: November 14, 2019

With Veterans Day recently passed, it reminded me of how a ragtag armada of everyday boating heroes kept World War II from America's coastline and became what we know today as the modern U.S. Coast Guard Auxiliary. Here's the story by Troy Gilbert.

From sailors to fishermen to power-boaters, ordinary citizens rose and volunteered themselves and their boats on every coastline of the U.S. becoming an integral defense force for the nation.

During a hot summer night in June 1942, the German submarine U-166 took aim at a U.S. Coast Guard patrol vessel escorting the passenger ship SS Robert E. Lee about 25 miles south of the mouth of the Mississippi River. Within an hour, the passenger ship would join the 56 other ships sunk off the northern Gulf Coast during World War II. Nearly 100 lives were lost on the SS Robert E. Lee, and the Coast Guard escort ship would claim the only sinking of a German submarine off the southern U.S. coastline.

In July 2014, the man who discovered the wreck of the Titanic, Robert Ballard, and a team of scientists aboard his exploration vessel Nautilus conducted a research expedition to study the long-term effects of the 2010 BP Deepwater Horizon oil spill. In the process, they documented many of these stricken World War II vessels, and a lost chapter in American maritime history emerged. Using remotely operated underwater vehicles equipped with high-definition cameras, many of these never-before-seen wrecks, some resting more than 5,000 feet deep, finally came in from the shadows and illuminated the straits in which the United States found itself during the early stages of the war. It was a situation that led to recreational boaters charging onto the frontlines to defend the country.

In 1941 after six U-boats managed to sink 41 ships in the targeted waters of the East Coast and the Florida Straits, a second, larger operation code-named Drumbeat was launched by the German navy, the Kriegsmarine. At the time, many U.S. citizens were still ignoring the calls for coastal blackouts by the government, which meant that the freighters and tankers that moved along the shores at night were conveniently silhouetted for the German navy. Taking advantage of that, an armada of 22 U-boats approached the U.S. coastline and the attacks were constant. In March 1942 alone, 70 American ships were lost to the U-boats on the U.S. East Coast and Gulf Coast, in what the Nazis terrifyingly referred to as the "American hunting season." This ongoing attack was kept largely secret from the American people by the U.S. government, which didn't want to admit how thinly stretched and outclassed the U.S. Navy and the U.S. Coast Guard were at this stage of the war — this despite several of the tankers exploding and burning for hours in plain view of port cities and their populations.

Finally, after many of the vital fuel ships supplying the Northeast were sunk, the oil and gas industry informed the U.S. War Department that the burgeoning war economy would grind to a halt from a lack of fuel in only nine months. There were 19 U-boats operating daily along the coastline; the U.S. government was under pressure, and at something of a loss, to counter the serious threat. At the time, the U.S. Navy was still ramping up the building of new warships, while the existing vessels were occupied with convoy patrols to England and with fending off the Japanese in the Pacific.

That was the critical moment when a surprising ragtag fleet of recreational boaters, the owners of schooners and powerboats, stepped forward. Immediately following the attack on Pearl Harbor, a small group of skippers offered up their personal boats for anti-submarine operations along the American coastlines, and these "coastal picket forces," made up entirely of civilian volunteers, eventually laid the groundwork for what became the modern-day Coast Guard Auxiliary.

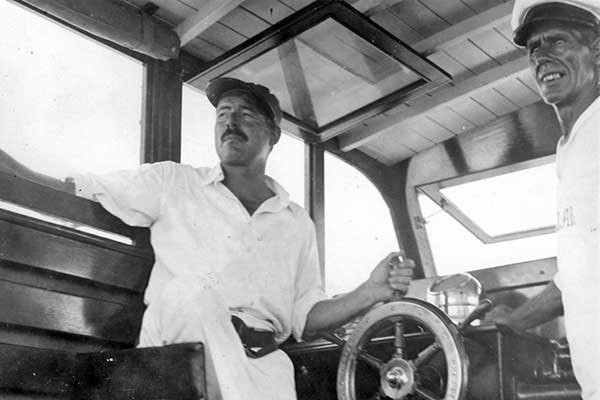
Ernest Hemingway and the crew on board his 38-foot fishing boat, Pilar, were the most famous examples of this citizen force; Hemingway patrolled the Florida Straits in search of German U-boats while armed with only grenades and Thompson submachine guns. While Hemingway's actions certainly added to his legacy, he also gave a symbolic face to the thousands of American yachtsmen and yachtswomen volunteering their time and vessels to defend the coastline of the United States and the vital supply lines through the Caribbean.

By August 1941, it was reported that nearly every yacht club along the East Coast had banded together to form a flotilla. This civilian navy fleet was a true sampling of the boating traditions around the country, from yacht owners in the Northeast to shrimpers in the local flotilla toured the area on a 24-hour basis, enduring storms and the blazing heat of summer. Off the coast of Louisiana, a convoy of 126 shrimp boats had crew members on constant watch for submarines while continuing to bring in their hauls of Gulf shrimp.

The flotillas also became vital in rescuing seamen from torpedoed vessels, freeing up the Coast Guard to actively hunt marauding U-boats. In one instance, when a Mexican tanker lay engulfed in flames and rapidly sinking just off the beaches of Miami, hundreds of citizens watching in horror witnessed the local flotilla "drive their little boats right into the flames" to retrieve survivors.

0

WHY YOU NEED A SURVEY

Posted On: November 12, 2019


Why Get A Survey

It's easy to fall in love with an appealing sheer line, shimmering gelcoat, and gleaming teak, but DON’T let your heart guide you; you need an objective marine survey to avoid buying with rose-colored sunglasses on.

A marine survey is an independent evaluation of a boat's condition and value, performed by a qualified inspector who has no stake in the outcome. In fact, even experienced surveyors will usually hire a fellow professional to do the survey on a boat they're considering, to keep emotion out of the equation. Many boats sit unused and get minimal maintenance. When these boats begin to be sold, a professional evaluation, devoid of the excitement of boat-buying, is even more critical. Here's what a good survey provides:

  • The condition of the boat and its equipment: A marine survey gives a snapshot of the condition of the boat's visible components and accessible structures at the time of the inspection. A survey provides a list of deficiencies as well as needed repairs and focuses on safety. Deficiencies in a survey can be used to renegotiate the sales price or scrap the deal altogether if needed repairs are too expensive or complicated.
  • The value of the boat: Surveyors use pricing guides along with their vast experience in valuing boats. A seller or broker may think a boat has a specific worth, but until a survey is performed, those figures are only guesses. Banks and insurance companies use the survey value to determine loan and insurance hull value amounts. This is also a great tool for price negotiations and can easily pay for the cost of the survey.
  • A budget for repairs and maintenance: Nearly any boat will have some defects and deficiencies; knowing what they are beforehand makes it easier to know how much to budget for the future. Surveys typically provide a list of recommended, prioritized repairs. The most important ones are critical to safety and usually your insurance company will require them to be completed. The rest are things that can be done as you find time and money.


0

HAULING YOUR BOAT OUT THIS FALL?

Posted On: November 07, 2019


For many, an annual haulout marks the end of the boating season.

Lifting Your Baby Out of The Water

On the actual day of the haul, plan to be there if you can. You'll be able to take a look at just how fouled the bottom is before it's pressure washed and you'll get an idea of how your antifouling paint is working. Most yards do this immediately after the boat is hauled so the fouling doesn't set like concrete. "We always pressure wash a boat as soon as it comes out of the water," Leszynski says. "We have a waste-recovery system, and this ensures any bottom paint, dirt, or other contaminants are contained. Pressure washing is included in the fee for hauling, and we won't move a boat into the yard until it has been washed."

It's normal for the owner to drive the boat into the travel hoist pit unless you have made alternative arrangements. Have plenty of fenders on both sides of the boat to protect the topsides should you be blown sideways. Listen carefully to instructions given to you by the yard staff operating the hoist who will have done this maneuver many times before. You probably won't need docklines because the boat will be going right into the slings, but check with the lift operator. Larger sailboats may have to back in to the pit and even have the backstay removed so the rigging will clear the hoist. The staff won't lift a boat with you or the crew aboard so they'll tell you when to get off and anything else they need you to do before vacating the boat. Don't forget to shut off the engines, air conditioners and other equipment before the boat is hoisted.

All tanks should be as empty as possible, and while it may not be practical to drain fuel tanks, it is relatively easy to drain water and waste tanks. Full tanks add significant weight to the boat, and empty tanks will put less strain on the boat's structure when it is sitting in an unnatural element on land.

Before the boat is hauled out of the water, tell the travel hoist operator about any underwater appendages, such as fin stabilizers or pod drives, transducers, speed wheels and other things not easily seen when the boat is in the water that could be damaged by the travel hoist slings. "We are familiar with most boat designs", says Leszynski, "but it is helpful if owners mention things that may be special about their particular boat".

On The Hard

If your boat is being lifted for anything more than an hour or so, often called a "short haul," it is likely that it will be placed on blocks in the yard and supported with jackstands. If this is the case, tell the yard about any relevant structural features of your boat. Some downeast powerboats, for example, have hollow keels aft, which could potentially suffer damage if the boat is improperly blocked and supported. In cases like this, blocks should probably run lengthwise rather than athwartships to provide adequate support.

As a general rule, the workers in the yard have much experience moving and blocking boats, so it's best to leave it up to them as to how they do it. By all means watch, but don't interfere unless you see something that is wrong or unsafe; if you see a problem, bring it up with the yard manager.

Once the boat is settled into her spot, inspect the jackstands. Ensure they have chains between them to prevent them from spreading, which could cause the boat to fall over. Be sure that the attachment points of the chain to the jackstands are secure. Sometimes the slits in the metal of the frame into which the chain links sit are torn or bent from use, which could result in slipping or failure. If a stand is severely rusted, ask to have it replaced.

Also check the ground beneath the jackstands. If the stands are resting on, for example, sandy or loose soil, and especially if there's a slope, this may present a problem in heavy rains. The majority of jackstands will have three or four legs and unless they are on a solid surface, they should have sturdy plywood pads or other good support placed underneath to distribute the weight over a larger surface area, preventing them from sinking into the ground. If you see any problems, discuss them with management as soon as possible.

0

THE WATER IS GETTING COLDER NOW

Posted On: November 05, 2019


GETTING THOSE LAST FEW DAYS ON THE WATER .….


Sometimes those occasional warm autumn days can be deceiving, because the water temperature can be frigid. Taking some simple steps can turn a worst-case scenario of a swamped or capsized boat into the best-case scenario for surviving cold-water immersion. To reduce the risk, make sure to not overload your boat, avoid those situations that put you at risk of going overboard and make sure everyone is wearing a life jacket.


Understanding the critical phases of cold-water immersion and knowing some basic techniques to delay hypothermia’s onset greatly increase your chances of survival. Cold shock is an initial deep and sudden gasp, followed by hyperventilation, which has been shown to increase breathing by 600 to 1,000 percent. Keeping your airway clear and wearing a life jacket greatly reduce the risk of drowning. Try not to panic, and concentrate on your breathing. Cold shock will normally pass in one minute.


Over the next 10 minutes, you will lose the effective use of your extremities. Concentrate on self-rescue; if that’s not possible, keep your airway clear and wait for rescue. Remain calm and don’t try to swim. Loss of body heat can be 10 times faster through the movements associated with swimming.

Hypothermia means that a person is losing body heat faster than he can produce it; but even in icy water it may take approximately an hour before a person becomes unconscious. (To learn more about surviving cold-water immersion, visit coldwaterbootcamp.com.) If you cannot get out of the water and help is not immediately available, draw your knees to your chest and wrap your arms across your chest (hugging your life jacket) in the Heat Escape Lessening Posture (H.E.L.P.), protecting the critical areas of heat loss. If others are in the water with you, huddle together with your arms around each other, both to conserve body heat and create a larger target to spot in the water.


Don’t Boat Alone Especially in the Fall and Winter

0