Blog September 2016

Latest

Posted On: July 16, 2023
Posted On: June 04, 2023
Posted On: April 04, 2023
Posted On: March 28, 2023
Posted On: March 14, 2023

Subscribe

Via Email:    

Archive


KNOWING THE TIDE TABLES

Posted On: September 27, 2016

I get asked often about Tide tables, and certain  ports. Here's some good information to digest.

Using A Tide Table

 Based on article by Mel Neale for Boat US

Tide tables tell you three important things for any given place: time of high tide, time of low tide, and heights of each. Here's how to figure out the times in between.

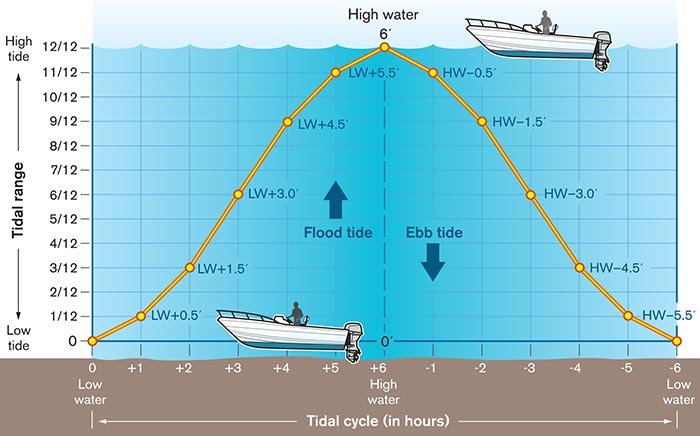
When you need to know approximately how much water is below your boat for a particular time of day, in a particular place, and you have access to the tide tables, the "Rule of Twelfths" will serve you well. It's an easy-to-use guide for "semi-diurnal" tides, which means there are two nearly identical complete tidal cycles a day (high, low, high, low, all within approximately 24 hours).

Basically, it takes about six hours for this tide to completely rise (flood) or fall (ebb). The "slack" period (when the tide is reversing directions) varies in duration depending upon your location, the stage of the moon, the force of the wind, and other factors. Slack tide may last only a few minutes or much longer, and doesn't necessarily correspond to the exact time of high and low tide.

The times of high and low tides, as well as tidal heights above or below chart datum (the numbers showing depths on your chart) for each day, can be determined from a number of sources, such as weather broadcasts, tide tables, navigation programs, some charts, and books such as Eldridge Tide and Pilot Book, published annually. If you're coastal cruising, keep a print version of the tide tables aboard for times when electricity and Internet connections are unavailable.

Find the NOAA tide tables for free at tides and currents.

For simplicity, let's use a 6-foot tidal range (range = difference between high and low tide heights). The range should be divided into 12 parts: 6 divided by 12 = half a foot. The tide will rise or fall one-twelfth in the first and sixth hours, two-twelfths in the second and fifth hours, and three-twelfths in the third and fourth hours.

Wind can affect tides by "piling water up" in or out of a short creek, or up, down, across a broad bay. When blowing for long fetches across the ocean or bays, wind can cause deeper water along the beach, and vice versa.

Keep in mind that all this is approximate and can be affected by phenomena such as high winds and storm surges. Also, in some parts of the world (for example, most areas of U.S. Gulf Coastal States, eastern Mexico, and some Caribbean Islands) tide cycles are "diurnal" (only one 12-hour rise and fall in each 24-hour period). Diurnal tidal areas often have weak currents with long periods of slack and little tidal range. Some areas have a mixture, where highs and lows are unequal and irregular. You will see this reflected in the tide charts. There are other exceptions where wind plays a predominant role, and depending on which way it is blowing on the water's surface, can make depths different from what you see in the tide tables. Always combine what the books say with what you observe around you


0

HAVE YOU EVER WONDERED .......

Posted On: September 22, 2016

A good article construed from information a fellow surveyor shared.

Impeller Fails

Ever wonder what goes on inside your raw-water pump? We didn't either. At least not until a surveyor sent us these pictures. The first shows a brand-new impeller. One thing you might notice is how squished the vanes are. When your boat's not used much, say over winter, these poor things stay folded over for months. After a while, they take a "set," which means they stay a little bent over like most of us would if we'd been hunched over for a whole season. This makes the pump a little less efficient, and every year, it pumps less water.

The other picture shows what happens when you ignore your impeller too long. Those poor vanes finally gave up and broke off. Actually, you'd be fortunate if they just broke off; what usually happens is that they get carried downstream in the cooling system, where they can clog your heat exchanger, or if you don't have one, clog the cooling passages in your engine. Either way, it can be a big job to retrieve them, and retrieve them you will — otherwise you'll be fighting overheating problems forever. This spring, replace your impeller(s) if they're over a couple of years old. It's one less thing you'll have to worry about.

0

APPLYING MARINE CAULK

Posted On: September 15, 2016

Seven Tips for Applying Marine Caulk


With a little knowledge, you can easily apply marine caulk or sealant. Here' are some tips.

Thanks to  Kevin Falvey June 3, 2016 Boating Magazine

Sooner or later the need to apply caulk, sealant or adhesive arises in every boater’s life. Here are some tips for making the job go easier.

1. Reef the Seam
Remove the existing bead of caulking with a reefing tool or reefing hook, either bought or made. I have used an old-fashioned can opener or a shop-made tool created by heating the shaft of an old screwdriver and then bending it at a right angle in a vice. Fein MultiMaster and Dremel also offer seam-reefing accessories.

2. Remove Residue
To ensure a good bond and seal, use a solvent to remove any residual skin of the old sealant. Lacquer thinner or mineral spirits work for most polysulfide and silicone sealants. Adhesive sealants may require specialty products: Check product labels. Wear protective gear when working with solvents and be mindful of fire hazards.

3. Mask Borders
Apply masking tape 1/8 inch to either side of the seam to be caulked. For rounded corners, “overmask” at a right angle, and then use a jar cap or other guide with a utility knife to carefully cut out the radius. Masking takes time, but using tape ensures easier cleanup.

4. Cut the Tip
Too many DIY boaters cut off the caulking nozzle tip wrong. It’s important to examine the tip and cut it at the point that is just a wee bit narrower than the width you need. Also, cut the tip at about 45 degrees. The actual hole should be an oval, the narrow dimension of which is just narrower than the seam or bead.

5. Push, Don’t Pull
In most cases, a neater result can be achieved by pushing the caulking gun while applying the caulk. Press just hard enough so that the speed at which you are pushing doesn’t exceed the rate of caulk being delivered from the tip. Ideally, there should be a slight “hill” or “ball” of caulk just in front of the tip as you move it along. Practice on scrap if you haven’t done much caulking.

6. Tooling Time
The time to tool — that is: fix, neaten or modify — the bead of caulk you applied is the time it takes the caulk to begin to skin over and will vary by brand and type and environmental conditions. Swipe the bead with a gloved finger dipped in water to smooth the bead. Wipe fingers clean between swipes. Be sure to peel the masking tape before skin-over also.

Caulking dries and cracks and should be renewed periodically around bilge and fuel tank hatches, ports, windows and the hull-to-deck joint.

0

NEW BOATING CAPACITY STANDARDS

Posted On: September 13, 2016

How Many Can I Safely Take  My Boat Take Aboard?

New Recreational Boat Upper Deck Capacity Standards enacted.

Overloading is an issue for all types of recreational boats. Recently, it has become a priority.


ALEXANDRIA, Va., September 9, 2016 – The membership organization that sets safety standards for recreational boat design and manufacturing, the American Boat & Yacht Council (ABYC), has revised its “Boat Capacity” (H-5) standard for upper decks on recreational boats. Upper decks are often referred to as the “fly bridge” or “upper helm.” The new standard, which is partly in response to fatal capsizing accidents involving overloaded fly bridges, will now include upper-deck weight capacity regardless of boat length.

Upper decks are typically found on boats greater than 25 feet and often found on fly bridge sportfish vessels, trawlers, houseboats and even some pontoon boats.

“New boats with upper decks will soon have an additional capacity placard for those areas to help boaters make smart choices about loading and stability,” said BoatUS Seaworthy magazine Editor Charles Fort. “This will help ensure boaters don’t make the mistake of overloading the upper deck.”

The majority of boats built today adhere to ABYC’s voluntary standards through the National Marine Manufacturers Association certification program. Additionally, ABYC offers standards for the maintenance and repair of recreational boats. “A boat that’s designed, built, maintained or repaired to ABYC standards helps ensure a safe day on the water,” added Fort.

Owners of older boats with upper decks may find the capacity in their owner's manual or by contacting the manufacturer.

To see more go to:

 ABYC has revised its Boat Capacity (H-5) standard for upper decks on recreational boats http://goo.gl/mOvBDf #BoatUS

0

LABOR DAY BOATING SAFETY

Posted On: September 01, 2016

Make safety part of your Labor Day weekend plans

The Labor Day holiday weekend is a busy boating weekend. Patrols will be out in force looking for people who are boating while intoxicated and operating in an unsafe manner. In an effort to increase safety, Coast Guard and local officers will be working over the holiday weekend. Boaters are asked to do their part by remaining alert for other boats and swimmers, and being courteous on the water. With more boats on the water, it is even more important to pay attention when operating a vessel.

Remember: If you choose to drink alcohol, don’t operate a vessel. Alcohol consumption slows reaction time. Pay attention to the boats around you and ask your passengers to assist with this. Evasive maneuvers should be made early and deliberately. Check your vessel’s navigation lights before heading out at night, and be sure to have spare bulbs on board. Avoid overloading your boat with too many passengers, and observe day and nighttime speed limits.

Have a safe and enjoyable weekend.

0