Blog May 2015

Latest

Posted On: July 16, 2023
Posted On: June 04, 2023
Posted On: April 04, 2023
Posted On: March 28, 2023
Posted On: March 14, 2023

Subscribe

Via Email:    

Archive


HOW TO FIND WHERE THE HECK YOU ARE ON THE WATER

Posted On: May 28, 2015

Dead Reckoning

Your on the water, but where am I?

Hey, Pirates never used chartplotters, and their depth finders were lead lines. But they found their way. Take a lesson from them. Bring along a ruler to use with your chart. Using the chartplotter or a GPS position from a cellphone, plot your position on the paper chart as you go along. To plot your course on paper, simply take the latitude and longitude coordinates from the GPS. Find the corresponding coordinates on the edges of the chart. Typically, the longitude coordinates are on the top and bottom edges, and latitude coordinates are on the left and right edges; some chart books have chart views arranged at other angles for space or clarity purposes. Using a straightedge, make a light pencil mark where the lines intersect.

After you've plotted three or four positions, wait 15 minutes or so, then turn off the chartplotter, paying close attention to the compass heading as you do so. Now try to keep track of your position without it. You may not know where you are at that moment, but you'll know where you were 15 minutes ago, and that'll be a pretty good clue. If you know this, you can "dead reckon," which comes from the phrase "deduced reckoning" and means steering by your compass while taking note of your speed and passing time to determine distance traveled. You'll likely find your way to where you want to go, or at least be close. You can also use landmarks, seamarks, and Aids to Navigation to verify and adjust your dead-reckoning position.

Unlocking the navigational clues scattered across your chart won't only add to your onboard fun — it will keep you safer should something knock out your electronics

0

GETTING YOUR TRAILERED BOAT SAFELY IN THE WATER

Posted On: May 21, 2015

Tips For Launching And Loading Your Boat

Well it's inevitable as the boating season gets underway, you will hear about some  incidents of boat ramp adventures.

Here's an article about getting that boat in the water safely.

By Michael Vatalaro
Published in the Spring Edition of Boat USA Trailering

It's as simple as 1, 2, 3, 4. But there's a knack and an order to getting it right.

1. Set The Stage

Before you even think about backing down the ramp, take 10 minutes in the staging area to load all the gear into the boat, attach lines to the bow and stern cleats, check that the plug is in, remove the rear tie-downs, put the key in the ignition, and unplug the trailer lights.

If you have surge brakes, unplugging the trailer lights will also depower the circuit that prevents your trailer brakes from locking up when you reverse. You'll need to use the manual brake lockout to prevent this. Also, if you know the ramp well, you can lower the motor or outdrive now, if you're sure it won't hit bottom.

2. Back It Up

Back down the ramp till the stern of the boat floats. If you can't tell when the stern is floating, have a crewmember positioned on the dock beside the ramp signal you when to stop. Put the vehicle in park and engage the parking brake, but leave it running. If you have trouble backing straight, place your driving hand at the bottom of the steering wheel. That way, whichever direction you move your hand, the trailer will turn in that direction.

3. Unhook The Bow

Depending on how steep the ramp is or how athletic you're feeling, you may be able to scramble along the bumper or step up onto the tongue of the trailer and not get your feet wet. But it's advisable to wear water-friendly shoes or rubber boots so you can wade in to reach the bow eye and winch handle. Many boat ramps are slick with algae during summer months, so don't be surprised if your feet start to slide.

Once you can reach the bow eye and handle, unhook the safety chain, then back the winch off to get enough slack to release the bow strap as well. Pass the line on the bow cleat to a crewmember on the dock, then push the bow of the boat up and off the trailer. If you've backed down far enough, this should be relatively easy, and the boat should float gently off.

4. Nice Going!

Now, Keep It Moving: While you head back to the driver's seat to park the tow vehicle, make sure the crew is walking the boat down to the far end of the dock to free up the ramp for the next boater.

0

HANDLING YOUR BOAT EFFECTIVELY

Posted On: May 19, 2015

It isn't necessarily best to meet waves bow on.

In light of the number of boat rescues needed ths past weekend, I thought it would be a good idea to revisit some basic information.

All to often, this results in the wave coming aboard suddenly as a large volume of water. This , of course, will depend on your boat, the speed you're running (which should normally be relatively slow if you're encountering waves), and the boat's buoyancy and other characteristics. Generally, it's best to take incoming sea to the port or starboard side just aft of the bow rather than dead on. This allows that broader and hopefully more buoyant hull section to meet the rising water, and it's far forward of taking it on the beam, which could flip you. Also, if you take it dead on the bow, you're more likely to have that narrow bow, which is designed to cut through the water, cut through the wave and not rise as much as is needed, allowing the wave to board you. Exactly how far aft of the prow you take a wave will depend on all the variables and will even change with such conditions as wave height and boat type and loading. But as you grow accustomed to your boat, you should get a good feel for this.

When maneuvering your boat, some basic boating skills will keep you safe on the water.

0

BEACH BABY.....

Posted On: May 12, 2015

How To Beach Your Boat
And Leave Again( Safely)

I get asked a lot of questions about beaching boats, especially when they get damaged. Beaching, rather than anchoring, to swim or go ashore can be a great way to temporarily secure your boat, if you do it the right way.

Found this article originally

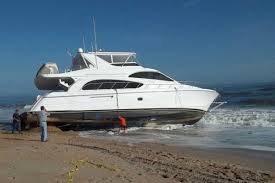
published By Michael Vatalaro in Summer 2013

 In many parts of the country, boaters gather on beaches and sandbars to swim and socialize. Beaching your boat to take part seems simple enough to do, but in order to make sure your boat is A) still there when you're ready to go, and B) still able to float at that time, it's important to take a few precautions.

Know Your Bottom

While most of the popular spots have sandy bottoms because it's comfortable for swimming, some places have soft mud or muck bottoms that can trap a boat in place, particularly on a falling tide.

Remember every beach is different, and just because you've done this 100 times at your local sandy shore, it doesn't mean the one three miles downwind is the same. Stay alert to the terrain, waves, and weather, and act appropriately, including abandoning the plan and putting out an anchor, or moving on somewhere else if your gut and the elements say it's not safe.

Know Thy Tide Chart

There is no surer way to meet your local TowBoatUS captain than by running up on a beach at high tide. By the same token, an incoming tide can lift a securely beached boat and carry it off, if you're not paying attention. And just because you boat on a lake or river system, don't think you're off the hook. Sudden changes in wind direction can push water away from a shore, or pile it up with the same result. Pop-up thunderstorms strand boats every year on both tidal and non-tidal waters by quickly building up wind and wave action that drive boats ashore before their owners can move them to deeper water.

Come In SLOW

A lot of boaters seem to think they need momentum to push the boat up on the beach or sandbar. Coming in much faster than dead slow only guarantees the sand will scratch up the gelcoat on your keel that much more. A smarter approach is to only motor in to where the water is waist deep, turn off the engine, trim the motor or outdrive all the way up, and then have a crew member go over the side to walk the boat to the desired location with a bow line.

Park So You Can Leave Again

With a favorable (incoming) tide and a protected location with little or no wave or wake action, veteran sandbar enthusiasts will pull the boat inshore until the keel under the bow firmly nudges bottom, and then take the anchor to the beach or further inshore to provide tension to keep the keel against the sand. But this leaves the stern of the boat vulnerable to being swamped by wakes, or for wind or wave action to push the boat parallel to the beach. If the entire keel ends up resting on the sand, it can be difficult to get the boat back into deeper water.

A better method is to march the bow in till the water is just over your knees, and then spin the boat 180 degrees so that the bow faces out toward the deep water (larger boats will require more draft). You can then walk or swim an anchor out to deep water, AND deploy one or two stern anchors or sand spikes on the beach to keep the boat pointed the correct direction.

Hear The Music

Wave action against the bow won't be an issue, and this has the added benefit of giving you and the crew easy access to the boat via the stern, and usually makes it easier to hear the stereo, too. When you are ready to go, pull up the stern anchors, get aboard, and pull the boat to deeper water using the anchor rode.


0

SIGNALING DEVICES FOR BOATERS IN DISTRESS

Posted On: May 05, 2015

                                                            Signal aids are critical to help rescuers pinpoint your boat's exact location in an emergency.

This from the Coast Guard.


A boat on the ocean is a small, hard-to-see target in good conditions, and even with all the technological advances in EPIRBs and communications technology that interface GPS information with the VHF radio, nothing can help rescuers get a visual fix on a boat in distress better than a flare or other visual signaling device. The U.S. Coast Guard requires you to carry the proper visual distress signals on board, and it's important to know how to use the different types in an emergency.

Aerial signals: Aerial signals are used to alert all the boats in the area that you're in trouble. They're fired from a variety of self-contained launchers or specifically designed pistols, and can reach an altitude of 450 to 1,000 feet. The combination of bright light and high altitude makes these flares highly visible from a long way off, but most have a relatively short burn time. The U.S. Coast Guard recommends firing two aerial signals-one immediately after the first has gone out-so that in an emergency, rescuers can confirm the sighting and/or the direction of the signal.

Handheld signals Once you've alerted boats in your area that you're in distress and have given rescuers a general idea of your location with aerial signals (and, often, radio or EPIRB contact as well), a handheld signal emits a bright light that will help your rescuers to zero in on your position. In an emergency, your rescuers have seen your aerial signals, confirmed your position on the radio, and use the light from a handheld to steer directly to you.

Smoke signals: Smoke signals are somewhat similar to handhelds in that they are designed to help pinpoint the location of a vessel in distress; they do so by emitting a thick, colored smoke rather than light. They're obviously of no use in the dark, but in daylight, a big plume of colored smoke is often more visible than the bright but relatively small light emitted by a handheld flare. And most smoke flares will float and work on the water.

All pyrotechnic signaling devices must be stored in a cool, dry place, and most are available with a tough, plastic, waterproof storage case. Make sure you keep the signaling kit in an easily accessible location on your boat. And remember: It's illegal to fire a distress signal in a non-distress situation.


0