Blog October 2016

Latest

Posted On: July 16, 2023
Posted On: June 04, 2023
Posted On: April 04, 2023
Posted On: March 28, 2023
Posted On: March 14, 2023

Subscribe

Via Email:

Archive


MAKING THAT FIBERGLASS SHINE

Posted On: October 27, 2016

How To Make Your Fiberglass Gleam

Now's the perfect time to get that lustre back. Roll up your sleeves and get ready to work, but the reward is well worth it.

Here's an article by Lenny Rudow with step by step instructions.


Seal out the oncoming winter with rubbing, buffing, waxing, and polishing, but don't forget the elbow grease.

Keeping gelcoat properly maintained isn't just a matter of vanity, it's also a matter of protecting your boat's fiberglass. Now that we have that out of the way, let's get real — you do want to dazzle your slip neighbors with the mirror-like hull sides on Mom's Mink, don't you? You're far more likely to be able to raise a good shine come spring if you remove the season's stains now and protect the fiberglass from the ravages of winter with a couple of good coats of wax. Luckily, keeping your boat in tip-top shape is a lot easier than it was in the old days when wooden vessels called for scraping, sanding, and painting for hours on end. But don't get too smug. There's still a lot of work in your future, so let's get started.

Step 1: Remove Oxidation

For the purposes of this article, we'll assume you're starting with gelcoat that's slightly oxidized. If it's extremely oxidized, you may need to call in a pro. If your gelcoat doesn't show any signs of oxidation (yellowing and/or a chalky, dull appearance), skip to Step 2. Oxidation occurs naturally, as exposure to sun and weather break down the gelcoat's surface and turn it chalky and pitted. If your boat is more than a couple of years old and hasn't been meticulously maintained, chances are there's some level of oxidation. The more there is, the tougher this step will be.

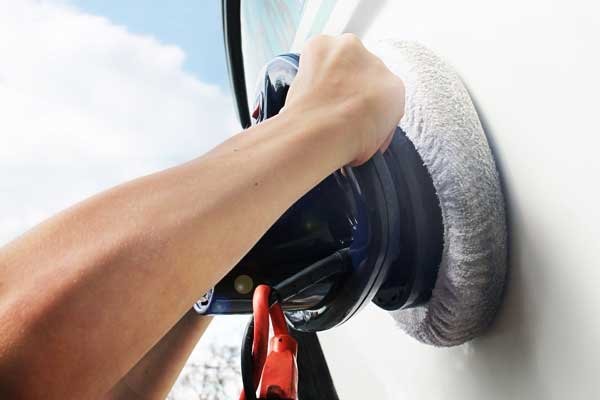
You need to hit every inch of the fiberglass with a good oxidation remover. As a rule of thumb, it's best to use the least abrasive oxidation remover possible, so you don't grind away lots of gelcoat. How will you pick which one is right? Test a few different products on a small section of the gelcoat to find the least abrasive product that still gets the job done. If you try to deoxidize the entire boat by hand, you'll blow out your elbows; an orbital buffer is a must-have tool for this task.

Fit the buffer with a terry cloth bonnet, and pour a big "X" onto it with the oxidation remover. Then hold the buffer gently against the hull side with even pressure, and hit the power button.

WARNING: If you hit the power button before the buffer is sitting flat against the hull, it'll spray oxidation remover in every direction.

Once the buffer is running, sweep it back and forth across the hull, going over the same area three or four times and being sure not to leave any gaps in your coverage. Never hold the buffer still, or it can "burn" a divot in the gelcoat.

You've hit the entire hull? Now look carefully for spots the buffer missed because there are always a few (under the rub rail, transom corners, and around thru-hull fittings, for example) and do them by hand. Then put a new bonnet on the buffer, and use it to rub off the oxidation remover. If the oxidation was severe, or if the remover you chose was too weak, you may have to repeat this step.

Step 2: Eliminate Stains

Once the oxidation is gone, there's a good chance you'll see a few stains. Let's get rid of them. Most can be attacked with rubbing compound and a rag, but toughies like rust streaks will require the use of an acid-based cleaner. These are often marked "fiberglass stain remover," but read the active ingredients to be sure some sort of acid is listed. Also be sure to limit their usage to where they're absolutely necessary, and follow the instructions on the bottle; these cleaners can give off harmful fumes, burn your skin, and damage the gelcoat if you don't thoroughly rinse them away after use. Be careful that you don't rinse them into the water.

Step 3: Bring Out The Shine

Now we can polish the hull sides into tip-top shape. There are many good polishing products from which to choose, but this is not the time to opt for a combination polish/wax. That stuff is great for midseason touch-ups, but not for sealing out winter weather. Go for a dedicated polish such as Starbrite Premium Marine Polish. Apply the polish as you applied the oxidation remover, sweeping the buffer back and forth across the fiberglass until the entire boat has been covered. Let it dry, and then remove it. Whew! You've probably worked up a sweat by now, but we're just getting started; you need to do the entire boat a second time, because one of the keys to making a boat shine like the sun is to polish it twice.

Step 4: Seal In The Shine

We'll bet the glare coming off Mom's Mink is downright blinding right about now, but if you stop working, the gelcoat's finish will go back to being dull in a matter of days. You need to seal that shine in, and wax is the key ingredient. For this step, choose a paste wax that's based on bee's wax, NOT carnauba wax, which does create a better shine but also wears away faster. Again, you need to give the boat two thorough coatings of the paste wax, and unfortunately, this stuff gets applied by hand. Now for the coup de grâce: a coating of that shiny carnauba stuff. Apply it lightly and gently, so you don't rub away any of the paste wax. Then clean it off with a final pass of the microfiber buffer bonnet.

That was a lot of work, but a lot less than scraping, sanding, and painting. In the spring, you should be able to get away with a quick polish and then sealing in the shine. You can keep your boat looking red-hot all summer by washing it down with a wash-n-wax boat soap that contains a dose of carnauba. If you're a perfectionist, renew the shine by giving the gelcoat another carnauba wax job every other week. And don't look directly at your boat's gelcoat without wearing sunglasses, or you might burn out a retina. If not, then it's time to (sigh) go back to Step 1


0

DRY RACK STORAGE

Posted On: October 25, 2016

Is it for you?

There are many benefits in using a dry rack storage facility:

It’s especially popular in warm weather locales. However, its available everywhere. Here’s an excerpt of an article that appeared in Boat US a while back covering the pluses and some drawbacks.

First, ease of use. You call ahead to have your boat brought down and even fueled. Then you arrive, hop in, and go. When the day is over, you return to the marina, dock the boat in the designated area, and leave. The marina washes it down and puts it back up on the rack.

Second, it may save money. Since you don't have a trailer, you're not spending money on gas, launch fees, or upkeep on the trailer. Also, because your boat isn't sitting in the water, you won't have to clean off the marine growth or bottom paint the hull every year.

Third, it keeps your boat in better shape. If your boat is sitting in a big steel barn and not constantly being bombarded by the sun's UV rays, you are lessening the possibility of gelcoat damage. However, keep in mind that if your boat is in a three-sided shed or a rack with just a roof, some sunlight might get on your boat.

Fourth, it's good protection for your boat. Most buildings have security measures like electronic security systems to stop vandalism and outright boat theft. Many of the newer buildings have fire suppression systems from sprinklers and even synthetic fire retardant foam systems. Also, many buildings in hurricane-prone zones have been built according to local hurricane codes. If you keep your boat in a hurricane-prone area, check to see what kind of protection the rack facility offers.

Fifth, it provides alternatives to keeping a boat and trailer sitting in the driveway. Due to homeowner association by-laws or city ordinances, some small boat owners can't keep their boats in their driveways. In addition, dry stack storage is good for owners who find themselves being kicked out of marinas to make room for larger yachts.

Last, it may be environmentally better in some circumstances. According to Delaware State Parks' Indian River Marina, dry stack storage "Minimizes need for dredging, minimizes water quality and flushing concerns, and reduces the amount of contact time between pesticide-containing bottom paints and the water."

Of course, as with everything, there are some downsides. Most places only allow you one launch and retrieval per day. That launch time can get long if the dry stack is extremely busy that day. Also there usually isn't any place at the facility to park your boat in the water and use it overnight. Also, you can't just show up at the facility and tinker around on your boat. Most dry stacks don't allow boat owners to work on their boats in the facility.


0

WINTERIZING AND HEATING YOUR BOAT

Posted On: October 13, 2016

Heaters and Winterizing

Shortcuts are too risky

In parts of the country that don't usually get too cold, plugging in a heater in the engine room seems a lot easier than lugging gallons of antifreeze to the boat and filling the engine(s) with it. But the reality is that in fact, using a heater can destroy your engine. When these places do get cold, it's often accompanied by an ice storm that takes out the power. No power to the heater equals unprotected engine, which equals permanent damage and a new engine.

And a  destroyed engine is actually much better than what else can happen when you use a heater for winterizing. An overloaded electrical system, a damaged extension cord, or a faulty heater can all cause your boat to catch fire and burn. Your boat neighbors are not likely to be happy to learn that your "shortcut" destroyed their boat, too.

Take the time to winterize your boat properly this winter.


0

BUYING AN OLDER VESSEL

Posted On: October 06, 2016

Buying a Boat?

Maybe an older one? 

Ah, I know they don’t make them like this anymore!

A proper inspection of a boat is a matter of knowing where to look for the most common problems. A good Marine Surveyor makes it easier to know where to focus. Because many of the issues on older vessels involve rot, corrosion, and/or manufacturers' defects, most therefore are not covered by insurance. Discovering issues early can help you avoid expensive headaches later.

An inspection is no substitute for a marine survey; if you're buying a boat, hire a professional after you've conducted your own checkout. Some tips you can do on your own before bringing in a surveyor follow.

Hull and Deck

The most serious structural issues on runabouts and center consoles are soft transom cores. Water that gets into the transom and can eventually compromise the hull's structural integrity. Professionals use the handle of a screwdriver or a small plastic hammer to tap on the transom to listen for signs of softness, which is something you can do as well. Start at any fitting below the waterline; a healthy ring means a solid core, while a dull thud often signals a soft spot. Stains around poorly bedded fittings, such as transducers or tie-downs, often indicate water slowly leaking out of the transom, another warning sign. If you suspect a problem, contact a professional. The repair is not a job for the average boat owner because it involves removing the affected core from between the fiberglass sandwich.

Decks and floors can also suffer from water intrusion. Leaking fittings, such as railings and cleats, will cause the deck core, either balsa, wood, or foam, to absorb water and delaminate. A delaminated deck feels soft underfoot. Floors often rot around seat bases, where water has leaked past the fittings. Mushiness and wobbly seats can indicate deteriorated plywood in the floor.

Gelcoat and Paint

Gelcoat is a very thin coating over fiberglass (to make it look glossy) and easily cracks wherever excessive flexing occurs, such as on unsupported decks or cabin roofs, or where the boat structure makes a sharp angle — at cockpit corners, for example. Though usually not serious, it can indicate that a "hard point" from an internal structure like a bulkhead is pushing from within and can reveal places in the hull or on deck that have weak supports. Gelcoat cracking in the hull can indicate minor collisions or trailering mishaps, though on lighter-built boats, they are often unavoidable. Crazing on a relatively new boat might call for a professional investigation. It's possible to re-gelcoat bad areas, but the cracking will almost certainly return unless the area is reinforced.


Do Some Research

Before buying a boat, do a little homework and search the available databases by make and model,

It's also a good idea to check the USCG recall database: http://uscgboating.org/links/recalls-and-safety-defects.php If a boat you're looking at (or your own boat) is listed in the database, call the manufacturer with the Hull Identification Number in hand and see if the recall has been addressed. There's no expiration on recalls, and if the work hasn't been completed yet, the manufacturer is obligated to do it.


0

DRESSING APPROPRIATELY

Posted On: October 04, 2016

Fall has arrived. Boating weather may range from freezing conditions for New England frostbite to very hot and humid tropical weather for offshore fishing in Miami or cruising in California. Staying comfortable means staying safe.

Wearing layered clothing helps keep you dry and comfortable, because each layer is only required to do one thing well. A hydrophobic wicking layer of long underwear worn next to the skin disperses perspiration outward. A middle insulating layer traps warm air, providing a barrier from cold outside air or fabric, and helps funnel moisture to the weather protection layer. The breathable outside layer uses hydrophilic, water vapor absorbing coatings or microporous membranes like a heat-driven water pump, allowing water vapor molecules to escape. Solid water molecules are blocked, along with wind, from entering. With each layer performing its designed function you stay dry, warm and alert, however hostile the outside environment.

Many boaters have no incentive to spend more for high-tech synthetic socks, and will instead wear cotton. The problem with this approach is that cotton retains moisture, and it is this moisture that causes friction and blisters. For years, many in the healthcare field recommended all-cotton socks to prevent foot problems. This is the biggest myth out there! Cotton absorbs moisture and in socks, that moisture stays next to the foot creating an ideal environment for bacteria and fungi to grow, and for blisters to form. Stay away from all-cotton socks!

The extremities, especially the head and neck, are where most of the body's heat loss takes place, so protection is critical for the head, neck, hands and feet as well.

Based on an article by By Tom Burden,updated: 08/25/2016 for West Marine

0